Brewing a Belgian white beer (or Witbier)

In spite of the really foul wet and windy weather, I decided to brave the elements and brew a beer over the leap year weekend – after all, I did have an ‘extra’ day in the year to do it!

English Ales are all very well, but once in a while it’s nice to brew something different, so I decided to brew a Belgian Witbier. To make the brewery day slightly easier I used my Braumeister 50L (BM) one-pot brewing system – less equipment to wash up at the end of the day!

INTRODUCTION TO WITBIER & ITS ORIGINS
Belgian white beer (or Witbier) has a unique cloudy-white appearance with very little bitterness, some spiciness, and a slightly sour/tart finish. There is a very light sweetness with soft, creamy feel that is not cloying or heavy. None of the flavours or aromas stand out, making for a light refreshing beer with a moderate alcohol level usually hovering around the 5% ABV mark. Wit beers are usually quite cloudy from starch haze, with a very light straw to light golden colour. It’s a refreshing beer for hot summer days (or even horrible winter ones!)

Arguably the most popular commercial version of this beer is Hoegaarden, named after the village near Tienen in Flanders, which was the modern birthplace of witbier. Records of brewing in the village date back to 1445, when the local monks were enthusiastic brewers, but the tradition died out in the 1950s as consumer tastes moved towards different styles.

Ten years later, Pierre Celis, a milkman who had grown up next to the brewery and sometimes helped with brewing, decided to try to revive the style. He started a new brewery, called de Sluis, in his hay loft. He used the traditional ingredients of water, yeast, wheat, hops, coriander seed, and dried bitter (Curaçao) orange peel. In the 1980s, with demand for the product continuing to grow, Celis bought a former lemonade factory, to expand his brewing operations.

Things changed after a fire in 1985. As is traditional in Belgium, several brewers offered their help to keep the business going and Interbrew (now InBev) lent money for the purchase of other buildings to rebuild the brewery. Over time, Celis felt very strongly that the company used the loan to pressure him to change the recipe to make the beer more “mass market”. So Celis decided to sell them the brewery and moved to the United States where he set up the Celis Brewery in Austin, Texas, to continue making witbier to what he described as the ‘original’ Hoegaarden recipe. It was later acquired by Miller Brewing who eventually closed the brewery and sold the equipment and brand names.

THE INGREDIENTS
Most Witbier recipes will call for crushed coriander seed along with the zest of fresh (or dried) oranges. I find that much of the spicy flavour behind a Belgian Wit already comes from the yeast (White Labs WLP400 Belgian Wit Ale or Wyeast 3944 Belgian Witbier) so I will often completely leave out the coriander and orange peel. Try it either way and see which you prefer. You can also use sweet dried orange peel, which is what I have used in this brew. Some witbier recipes will also call for chamomile flowers as a reportedly “secret” ingredient that Celis used in the original Hoegaarden recipe. He debunked this in later interviews, indicating that coriander and bitter orange peel was all that he ever used.

As well as the more usual Pilsner malted barley malt found in this beer, I used flaked oats and flaked wheat (both unmalted). I did a short cereal mash at 50C to help the flaked grains along. A cereal mash step is used with unmalted or low enzyme grains such as rice, corn or oats to gelatinise the sugars before continuing with a traditional mash. To avoid a possible stuck mash with all the flaked grains, I used some rice hulls to help break-up the grain bed and allow the mash liquor to properly circulate during the mashing process. Flaked wheat and oats do not have a husk, so the natural filter bed in the Mash/Lauter Tun is greatly reduced. Brewers with systems that are prone to stuck sparges should add rice hulls at a rate of about 20:1 wheat to rice hull ratio to avoid stuck sparges.

THE BREWING
A pretty standard BM brew really, but I used a new Bacbrewing top extender filter with a cross tension piece of my own making. The Bacbrewing plates are supposed to be used with the supplied wing nut on its own, but I found that this did not clamp the plate tight enough to prevent grain seepage out of the malt tube. So I used my cross piece with the wing nut. This worked perfectly.

Recipe Specifications
Boil Size: 55.77 L
Post Boil Volume: 50.52 L
Batch Size (fermenter): 45.00 L
Bottling Volume: 43.00 L
Estimated OG: 1.057 SG
Estimated Colour: 6.8 EBC
Estimated IBU: 15.7 IBUs
Brewhouse Efficiency: 70.00 %
Est Mash Efficiency: 75.4 %
Boil Time: 90 Minutes

Water and treatment
75.0 L Thames Water tap water
18.5 L RO Water (from the Kingfisher’s Aquarium in Beckenham and used to dilute the tap water mineralisation)
500.0 mg Potassium metabisulphite (adding to the bulk water to remove chlorine and chloramines)
13.0 ml Lactic Acid 80% (used in sparge water only)
80.0 ml Hydrochloric acid 1M (used in mash liquor)
13.0 ml Sulphuric acid 2M (used in mash liquor)

Ingredients:
0.6 kg Rice Hulls (0.EBC) 5.0%
5.0 kg Wheat, Flaked, Unmalted (4.EBC) 41.3%
5.5 kg Pilsner (Weyermann) (3.3 EBC) 20.7%
0.5 kg Oats, Flaked (Instant/Ready Oats) (3.EBC) 4.1%
0.5 kg Brewing Sugar (Dextrose) (0.EBC) 4.1%
100.0 g Hallertauer Hersbrucker hop pellets 3% Alpha (Boil 60 mins) 15.7 IBUs

100.0 g Dried Orange Peel, Sweet (Boil 5.mins)
30.0 g Crushed Coriander Seed (Boil 5.mins)
0.5 Items Protafloc Tablet (Boil 15.mins)
1 tsp Yeast Nutrient WLN100 (Boil 10 mins)

4 packets Belgian Wit Ale yeast (White Labs #WLP400)

Mash Schedule:
Total Grain Weight: 12.1 kg
Mash In: Add 52.87 L of water 50C 15 min
Mash Step: Heat to 68C for 90 min
Mash Out: Heat to 76C for 10 min
Sparge: Fly sparge with 15.00 L water at 76.C

Brewing Notes:
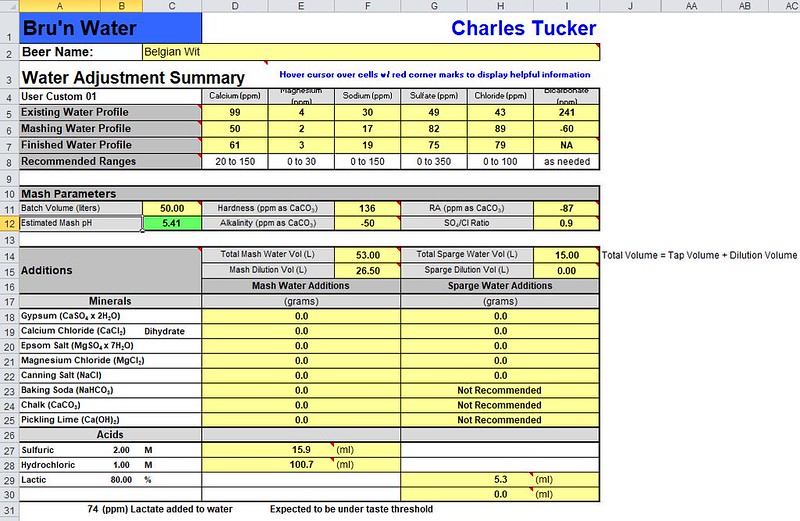
Water treated with brewing salts to: Ca=50, Mg=10, Na=16, Cl=70, S04=7
(Hit minimums on Ca and Mg, keep the Cl:SO4 ratio low and equal).

Mash liquor pH no grain after acids was 2.98. Sparge pH was 5.3.
Mash pH at 68C was 5.68, then 5.47 after 4mins.
pH in boil kettle was 5.47. Post boil volume in kettle was 54L.
48L into fermenter at pH 5.3.

Cool wort to 20C and aerate well. Wort was aerated with pure oxygen using a wand for 60 secs at 1L pm flow.

Start fermentation at 20C and raise to 23C for the last third of fermentation.

Now for some pictures of the brewing underway

Summary of water additions using the Bru’n Water app:

A video of my grain mill in action:
Pilsner milling

The flaked oats and flaked wheat:

“Mosaic” shot of the grains before going into malt tube:

Unfortunately, at my age, a few aids are needed to help get the grains in the malt tube!:

Malt tube top filter in place:

And a video of the top plate performance showing the mash recirculation just starting to rise:
BAC top filter with my spreader

Mash pH:

Hops, ground coriander and sweet orange peel ready for the boil:

Final appearance of beer as it went into fermenter. Looks just the right colour and cloudiness:

Package as you would normally. I rack to 19 L Cornelius kegs that have first been purged with CO2. I chill the kegs to near freezing while carbonating at the same time in a keg conditioning fridge. After about 1-2 weeks at serving pressure the kegs will be carbonated and ready to serve. If you are in a hurry to drink it, this beer is best served fresh, so raise the CO2 pressure temporarily to 30-40 PSI to carbonate fast over a 24 period, and then turn back down to serving pressure. Carbonate this beer to higher than normal levels, around 2.5 to 3.0 volumes of CO2.

Brewing a London Porter

I love my dark beers, and if I’m honest, prefer them to many of the cloudy, hop milkshake, American type IPAs that you seem to get everywhere today. So here is how I brewed an old fashioned style London Porter derived from a Fuller’s 1880 recipe. The recipe I have used is based on one from Graham Wheeler’s book called “Brew Your Own British Real Ale”, 3rd Edition, and was published by CAMRA in 2009. As well as using traditional English hops, this will be an all-grain brew using kilned malts only. No additional sugars or adjuncts are used. The brewing method is as pure to traditional English brewing as you can get in a home brew setup!

The origin of how ‘Porter’ got its name is an unsolved mystery subject to much speculation. The usual explanation is that it was named after the London street porters of the 18th and 19h centuries. This has never really been proven. Originally, when this beer was made it was stored for some time to mature. Graham Wheeler suggests that the name may come from the Latin “potare”, which was probably chalked on the wooden casks when the beer had matured enough and was fit to drink in the sense of being potable.

A word on the ingredients
The Fuggle hop originates in England and was first discovered in 1861 in a hop yard owned by George Stace in Kent. Some 14 years later it was officially named and introduced by Richard Fuggle of Benchley in 1875. Similar to a Styrian Golding, it is noted for its distinct European aroma and has enjoyed a long, versatile run. At its peak nearly 100 years ago Fuggle was known as a dual-use hop, used both for bittering and aroma. Today however, as other higher alpha acid varieties have become more prevalent, it’s now more prominently used for its aroma. In this recipe it is used for both.

Maris Otter Ale Malt is a traditional, two-row, low-protein, winter barley variety with deep roots in English brewing. It is today considered the keystone malt for authentic British ale flavors. It was first bred in 1966 by Dr G. D. H. Bell, the director of the British Plant Breeding Institute (PBI), which was then located on Maris Lane, in Trumpington, England. Maris Otter is considered a very “malty-tasting” pale base malt, which has made it a favourite among traditional cask ale brewers for decades. Using Maris Otter, brewers are able to create beers of relatively low gravity and alcoholic strength, such as “ordinary” bitters, while retaining a genuinely malty flavour profile. After its introduction, Maris Otter quickly became popular with brewers because of its low nitrogen content, excellent malting homogeneity, and good enzymatic strength, which makes it easy to malt and mash.

Traditionally Brown Malt was produced on a special kiln which was heated by wooden poles and faggots. Hornbeam faggots were the most commonly used, cut to 5 foot lengths, and burnt to give the malt a harsh, smoky and biscuity flavour. Because of the lack of availability of these specially prepared brushwood faggots, all Brown Malt produced in the UK is now made in the roasting drum. It is sometimes referred to as ‘drum-brown’ and is cooked at a low temperature to impart a dryer and less sweet character than Crystal Malt of the same colour. Its uses are generally restricted to specialist bottled beers, brown ales and sweet stouts.

Crystal malts are specialty grains that add flavour and colour to any brew. These malts are used in many beer styles, from pale ales to porters, and are the most widely used type of specialty grain. You can use crystal malt no matter what type of homebrewer you are — extract, partial mash or all-grain. Adding crystal malt is a common way to add a sweet flavour to beer. The sweetness of crystal malt has distinct caramel tones to it. Crystal malts also add body to your beer.

Special B Crystal Malt is the darkest of the Belgian crystal malts. This malt will impart a heavy caramel taste and is often credited with the raisin-like flavours of some Belgian Abbey ales.

Black malt primarily gives a highly roasted flavor, that carries some bitterness and acidity. But it can also show a deep fruity character reminiscent of currants, blackberries or sultanas. It gives deep contrast to a round malty beer by giving it some elbows, without being pushy. Most importantly, even in very small quantities, it provides a drying quality that brightens up the finish of any beer.

Carafa Special III dehusked chocolate malt is a dark-roasted specialty malt made from high-quality spring barley. It’s carefully roasted to add an espresso-like bouquet, coffee and chocolate flavors, and a mild but noticeable roasted aftertaste.

Here is the recipe:

Type: All Grain
Batch Size: 42 L (into fermenter)
Boil Size: 52 L
Boil Time: 90 min
End of Boil Vol: 44 L
Final Packaging Vol: 39 L
Brewhouse Efficiency: 91 %
Est Mash Efficiency: 94 %

Original Gravity: 1.058 SG
Final Gravity: 1.015 SG
Estimated Alcohol by Vol: 5.6 %
Bitterness: 33 IBUs (International Bittering Units – how strong the hop bitterness is)
Colour: 60 EBC (The colour of beer is measured in EBCs. EBC stands for European Brewery Convention)

Mash Ingredients:
6.65 kg Maris Otter Ale Malt (5 EBC) 73 %
1.10 kg Brown Malt (105 EBC) 12 %
0.9 kg Crystal Malt (140 EBC) 10 %
0.24 kg Carafa Special III dehusked chocolate malt (1400 EBC) 3 %
0.10 kg Special B Crystal Malt [Steep] (300.0 EBC) 1 %
0.10 kg Black Malt [Steep] (1300 EBC) 1 %

Mash Steps:
1.) Mash In. Add 47 L of water at 70 C, hold at 67.0 C 90 min
2.) Mash Out and Vorlauf. Add 0.00 L of water and heat to 77.0 C over 20 min, hold at 77.0 C 15 min
3.) Fly Sparge. Sparge with 13 L water at 76.0 C

Boil Ingredients:
125 g Fuggles leaf 3.8 % Alpha – Boil 90.0 min – 29.7 IBUs
40 g Fuggles leaf 3.8 % Alpha – Boil 10 min – 3.2 IBUs
1.00 tsp Yeast Nutrient (Boil 15.0 mins)

Fermentation:
2 pkg — Wyeast Labs 1968 London ESB Ale (aka Fuller’s yeast)
Ferment at 18C – 20C for 10 to 14 days

Water adjustment:
You may remember in my last article I wrote about the need to get the water right for brewing purposes. When I brewed the English Pale Ale we needed water that was high in sulphates and low in chlorides. When brewing a porter the salts need to be the other way round. This helps to give a porter the roundness of flavour and the smoothness we expect from a dark beer. So in parts per million (ppm) this is what the brewing water (liquor) looked like after my adjustments:
Calcium (Ca) 113
Magnesium (Mg) 5
Sodium (Na) 27
Sulphate (SO4) 70
Chloride (Cl) 174
Thus giving a chloride to sulphate ratio of 2.4:1.

Now for some pictures of the brewing equipment and the process.

For this brew, I am not using my normal 3 vessel setup as shown in the November posting, but using a one-vessel system called a Braumeister. This is really a large, stainless steel version of a simple BIAB system (Brew-In-A-Bag). You still need an HLT (Hot Liquor Tank) for sparging. Here’s a picture of the setup:

This is the home made control panel that I use to control the Braumeister and the HLT:

Here’s what the grains look like after crushing and before adding to the mash process:

After the mash is underway for 20 mins, it’s time to check that the pH is right for the conversion of the malt starches to fermentable sugars:

This is a view inside the Braumeister showing the mash liquor rising up the inner tube:

Once the mashing is over, the inner metal tube containing the malt grains has to be raised to do the sparging (grain rinsing). Full of soaked grain, this tube can be very heavy and needs some kind of hoist to lift it. I use a small car engine hoist:

Pumping the finished wort after the boil into the fermenter via the cooling coil:

This is a view of the spent hops left after finishing the hop boil and draining off the wort to the fermenter:

Well, that’s it for now. This beer turned out really well for me and I won second prize with it in a recent national brewing competition. For further explanation of the brewing terms have a look at the end of this article “Brewing an English Pale Ale” on my HOME page. If you do make this beer, drink it slowly and give a thought to Graham Wheeler. Thank him for the rich brewing knowledge that he so willingly shared in his lifetime.