
INTRODUCTION
Named after Robinsons’ brewery cat, Old Tom is almost as old as the brewery itself. Brewed since 1899, it is recognised, both nationally and internationally, as one of the most famous strong ales, winning some of the industry’s most prestigious awards including World’s Best Ale.
Old Tom is dark, rich and warming with a cherry brandy like colour and character. This strong ale has a booming balance of ripe malt, and peppery hops combined with roasted nut and chocolate flavours with a smoky richness. A distinctive deep port wine finish with bitter hops balance complemented by heady, vinous aromas of dark fruit.
Conventional whole grain brewing traditionally uses three vessels: a Hot Liquor Tank (HLT) for heating up the brewing and sparging water; a Mash Tun (MT) to extract the sugars from the grain and create the wort; and a Boil Kettle (BK) to boil the wort with the hops. My three vessel (3V) system uses two 75 litre and one 100 litre stainless steel pots. So as you can imagine, this means three pots to set up and three pots to clean.
As I store all my brewing gear in the loft, it also means three pots to hoist down and carry out to the gazebo that I erect in the garden to use as my brewery. So to make this an easier brewing day for me, on this occasion I am using my Speidel Braumeister 50 litre one-pot brewing machine (BM). The BM is a ‘pot within a pot’, the inner pot being used as a type of mash tun called a ‘Malt Tube’. The malt tube contains the grain and is raised after mashing and sparging, leaving the wort behind inside the larger pot for boiling. However, with large grain loads the malt tube can be extremely difficult to lift and remove. This time in using my BM I am using a new home made crane to do the lifting for me – I described how I built the crane in a recent brewing blog article.
More on using the crane later, including a video of it in use. However, to help contain your excitement, here’s a picture of the crane and the BM all set up and ready to go:

I did say that the BM is a one pot brewing system, and normally in using it you would use a no-sparge method of mashing. One of the things that make the no sparge method so simple is that you use the full volume of brewing liquor (treated water) in the mash, which makes adding minerals and acids easier for those of us who tweak our water profiles, as you’re not calculating mash and sparge additions. However, in practice I have found that sometimes your water quantity calculations can be slightly out and more treated water at the right temperature is needed. Additionally, a small supply of instant, nearly boiling water can be useful for rinsing and sterilising pumps and cooling coils. So when I use my BM, I also use my small HLT which contains 11 litres. I made this from a Baby Burco stainless steel 10 litre catering urn and here is a picture of it with recirculating hoses attached.

One thing that is always a concern when brewing is safety. Particularly as you are using very hot water and electricity to heat it. Electric pots mean lots of electric cables to heat the elements. There are also cables attached to the pots that link to temperature controllers. Finally, the electric pump I use for liquid transfer has a cable. All these cables dangling along the ground and each running to a power supply can be a trip hazard. You do not also want to dart here and there to switch things on and off. To manage the power supply for the pots, pumps and temperature controllers I use a homemade control panel. This has a single 30 amp power supply going in, and the power to the various items runs from this via on-off switches. Temperature control of the HLT is also done from this control panel. Much safer and only one power cable running to a 35 amp weatherproof Commando socket in the garden. The control panel also contains a timer and relays to help control the brewing processes. Here’s a picture of it:

ABOUT THE INGREDIENTS
Fermentables
The main ingredient of this recipe should be Pale Malt, such as Maris Otter. As I found myself with no stock of this, I am using a combination of Baird’s Vienna and Munich Malts to get the right maltiness profile. Vienna malt is a well-modified lager malt with an elevated malt colour to add character and toastiness to beers, in particular darker lagers. It can be used as 100% of your grist but more commonly used to add body, mouth-feel, and toffee flavours to lager beers. Munich malt is a darker version of Vienna Malt and is the highest coloured version of true malts that can still be used as a base malt. Munich has more pronounced rich toasty flavours and is ideal for dark ambers, milds, and brown ale beer styles. During the final phase of Munich production, modification continues during kilning so that the very high finishing temperature lends itself to the mouthfeel of a beer.
The recipe needs a decent amount of Crystal Malt and for this I am using Dingeman’s Special B. This is the darkest of the Belgian crystal malts. Through its unique double drying process, Special B has a unique aroma and flavour. The Special B imparts a heavy caramel taste and is often credited with the raisin-like flavours of some Belgian Abbey beers. It can substitute Chocolate and black malt when bitterness is not desired.
Chocolate Malt is used in equal proportions to the Crystal Malt. The Chocolate Malt I am using comes from Simpsons and gives the beer a stunning dark brown colour. Chocolate overtones and hints of coffee bring richness and complexity at higher usages in Stouts and Porters.
Picture of the grains before and after milling are show below:


Old Tom is a high gravity beer with a dry finish, and so the final fermentable I am using is sugar. Not ordinary cane sugar, but Ragus Brewer’s Sugar Number 1. This is produced as a fully inverted glucose/fructose mixture seeded into a crystalline block. It’s 95% readily fermentable, with a subtle colour and mellow flavour. It’s used in brewing lager and pale ale. It’s fudge-like in appearance and easy to cut what you need from the block, as shown below:

Yeast
The yeast used on this occasion is “LALLEMAND Nottingham – High Performance Ale Yeast”. Nottingham is an English style ale yeast used for a wide variety of styles and fermentation conditions. Traditional styles brewed with this yeast include, but are not limited, to Pale Ales, Ambers, Porters, Stouts and Barley wines. In addition to these traditional styles, Nottingham can be used to produce Golden Ale, Kölsch, Lager-style beers, IPA, and Imperial Stout, among many others. Nottingham is a relatively neutral ale strain that is stress tolerant making it a good choice for high gravity, sour and other challenging fermentation conditions.

Hops
This is an English old type barley Wine, so traditional English hops work best when making this beer style. I have used Whitbread Goldings Variety (WV) and Fuggle. WGV has a distinctive and robust flavour and although Goldings features in its name, it is more likely to have had a Fuggle pedigree based on its Farnasene content (Farnesene is a component of the hydrocarbon fraction of hop oil). Fuggle is revered as the classic English aroma hop and is often used in conjunction with Goldings. It can be used as a main copper hop and is also used for dry hopping. The Fuggles I have used are from my CAMRA colleague Bob Keaveny that were grown locally in his ‘hop garden’ and harvested in September 2020.
The recipe details now follow.
ROBINSON’S OLD TOM – RECIPE DETAILS
All grain recipe with no sparge. I used my Speidel 50L Braumeister to brew this beer, so the figures below relate to my particular set up and should be adjusted as necessary to your own equipment requirements.
Vitals:
- Size: 29 Litres (post-boil hot)
- Batch volume into fermenter: 25 Litres
- Mash Efficiency: 86 %
- Attenuation: 76.4%
- Calories: 88.0 kcal / 368.3 kJ per 100ml
- Original Gravity: 1.090 (style range: 1.085 – 1.120)
- Terminal Gravity: 1.019 (style range: 1.024 – 1.028)
- Colour: 63.5 EBC (style range: 21.5 – 71.0)
- Alcohol: 9.3% ABV (style range: 8.5% – 12.2%)
- Bitterness: 50 IBU (style range: 40 – 65)
Mash:
- 6.5kg Vienna Malt (Bairds) 7 EBC (73%)
- 1.5 kg Munich Malt (Bairds) 9.9 EBC (17%)
- 0.675 kg Special B (Dingemans) 300 EBC (7%)
- 0.250 kg Chocolate Malt (Simpsons) 1200 EBC (3%)
N.B. Percentage of fermentables in mash excludes sugars.
Mash water 44 litres. Mash volume 51 litres (water + grain). 55 litres total water (11 litres in HLT).
Mash pH 5.47
Boil:
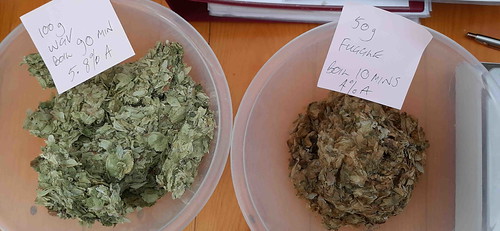
- 100 g WGV Hops (5.8%) – added during boil, boiled 90 min (45.6 IBU)
- 50 g Fuggle Hops (4.0%) – added during boil, boiled 10 min (5.4 IBU)
- 0.5 Protafloc Tablet (Irish moss) – added during boil, boiled 15 min
- 0.25 g NBS Yeast Nutrient – added during boil, boiled 10 min
- 7 g Polyclar BrewBrite (finings)- added during boil, boiled 10 min
Post boil:
675 g Invert Sugar #1 30 EBC (7% of total fermentables). Pre-dissolved in small amount of the boiling wort and stirred into beer in fermenter before pitching yeast.
Yeast:
4 packets of Imperial Nottingham Yeast
(Rehydrate yeast as follows: 400ml of boiled, cooled water at 30-35C; sprinkle yeast; wait 15 mins; stir briefly; let sit 5 mins; swish round and pitch. Roughly 598 billion yeast cells)
Bottling/kegging stage:
100 g of table sugar dissolved in a little boiled water and added to bulk in bottling bucket.
NOTES / PROCESS
- Add 300mg potassium metabisulphite to 55 litres tap water to remove chlorine / chloramine.
- Water profile Randy Mosher Pale Ale modified: Ca=110, Mg=18, Na=16, SO4=100, Cl=50. SO4/Cl ratio 2.1.
- 4.5 L/kg mash thickness with no sparge.
- Single infusion mash at 66C for 90 mins.
- Raise to 77C mashout temperature and hold for 15 mins.
- Boil for 90 minutes, adding Protafloc, etc., as per boil schedule. Lid on at boil-out, whirpool with large spoon or paddle and allow to settle. Start chilling immediately.
- Whilst wort is boiling, draw off about 500 ml in a plastic jug and dissolve the 675 g of invert sugar.
- Cool the wort quickly to 20C (I use a one-pass convoluted counterflow chiller to quickly lock in hop flavour and aroma) and transfer to fermenter.
- Stir previously dissolved invert sugar mixture into fermenter.
- Aerate well. I use pure oxygen from a tank at a rate of 1 litre per minute for 90 seconds.
- Pitch yeast and ferment at 19-21C (wort temperature).
- After the beer has fermented to near final gravity the beer is raised from fermenting temperature to a higher temperature roughly 1-2 degrees C above the original fermentation temperature and allowed to sit for two to four days for a diacetyl rest. Assume fermentation is done if the gravity does not change over 3 days.
- Before packaging you may optionally crash cool to around 6C and rack to a bright tank or bottling/kegging vessel that has been purged with CO2 to avoid oxygen pickup. Leave tightly covered for two days to clear.
- Gently stir-in bulk priming sugar.
- Package as you would normally. I racked 8.5 litres to a 9L cornie keg that has first been purged with CO2, and into 40 X 330ml Steinie bottles. After 1-2 weeks at serving pressure the keg will be carbonated and ready to serve. The bottles should be stored two weeks at room temperature, then moved to a cool room for one week.
COMMENTARY WITH PICTURES AND VIDEO
To start with, here’s a picture of the “Head Brewer” at work in the ‘brew-gazebo’:

To make sure that you get an even flow of circulating mash liquor, I always make sure the BM is set level on its adjustable stand.

Adding the grains to the liquor (treated water) in the BM malt tube for mashing:

I always find it hypnotising as the malt liquor starts recirculating during the mashing process:
After adding the grain and waiting about 20 minutes, the mash pH measurement is taken. In this case it was in the acceptable range without the need for any additional treatment salts:

Once the mash is over, the malt tube is raised and the wort heated to boiling. I know you were all eager to see this, so here’s the crane operating – so easy and effortless!
Of Course, after draining the malt tube has to be completely removed ready for boiling, so here’s another exciting crane video for you:
Don’t you just love my crane?
As the wort is heating up for boiling I get the hops ready:
A nice rolling boil is what we are after:

Once the boil is over, the wort is whirlpooled and left to settle. This is the time to set up the hoses and Counter Flow Chiller (CFC) ready for chilling. The hoses and their correct connections can be a bit of a nightmare, so care is needed!

Here we are running off the cooled wort into the Grainfather Conical fermenter:

The connections to the CFC are clearly shown in this picture:

The CFC is brilliant at dropping the hot wort at around 90C down to the 20C needed in the fermenter. Fortunately, my ground water temperatures are quite low in comparison. The small dial shows the ground water temperature in and the large dial the wort temperature out:

This is what is left in the BM after the wort has drained off the hops:

The Nottingham yeast is a very quick starter and after a day this is a peek inside the fermenter with the yeast cells chomping away at the sugars:

The conical fermenter is stored in my cool room, which is really a converted under-stairs cupboard. Here I can connect it up to my converted Maxi pub shelf coolers. This gives me very fine control over the fermentation temperature. Looks a bit like a Dalek!

After about 7 days, the finished beer is transferred to the bottling/kegging bucket ready for final packaging.

CONCLUSION
Another successful brewing day completed. All I have to do now is to let it mature in the bottles for 3 or 4 months and it will be ready to imbibe at Christmas, although I suspect one or two sample bottles will be downed before then!
This recipe was derived from a book written by Graham Wheeler. He describes the beer as “A full bodied dark beer with malt, fruit and chocolate in the aroma. A delightfully complex range of flavours includes dark chocolate. Full maltiness, port and fruit tastes lead to a long, bittersweet aftertaste.” I will let you know if he was right!

